
I recently did a small project where we wanted an easy way for users to create subsites without them having to think about Sharepoint templates and make to many choices.
We decided to make a Sharepoint list and have the users create a new entry in this list with only two fields, Site name and Site Description. We then developed a Sharepoint Event Handler that took care of creating the subsite with a predefined Sharepoint Template. The template was built from a standard team template and saved as a solution to the Solution Gallery in Sharepoint.
So for step 1 we created a new Team Site in Sharepoint and configured it the way we wanted, with a Task List webpart on the Home page, the lists and views we needed.
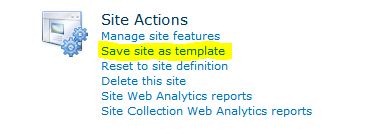
then we went to Site Setting on the Site Actions menu and clicked save site as template in the Site Actions section.
Give your Site Template a name and click OK. For this demo we will call our template “Test Project”
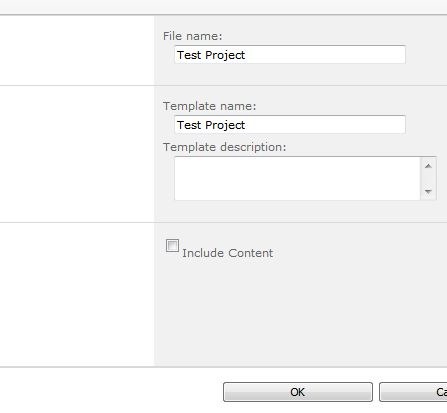
This will save the template to the Sharepoint Solution Gallery and you can now create new sites based on this template.
In the Operation Completed Successfully dialog window you can click the solution gallery link to navigate to the solution gallery and see your template saved or click OK to return to the Site Settings page.
The code in our Event Handler will use this template to automatically create subsites for the user when the add an item to our Subsite list. So lets create the subsite list.
Click the Site Actions menu, click More Options and create a new Custom List. Name this list SubSites.
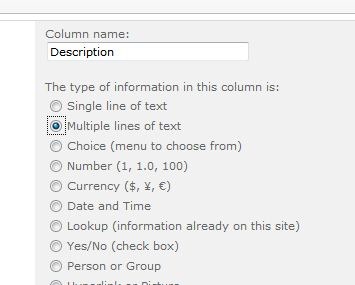
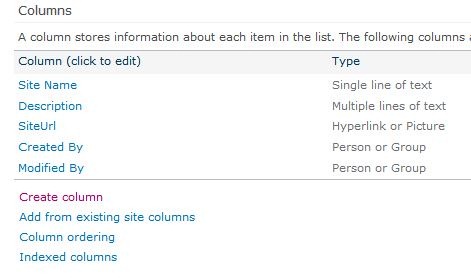
Go to List Settings for the SubSites list and we will add a couple of columns. Click add column and type Description for the name and select Multiple lines of text for the type.
Click Ok and add a new column. Name this column SiteUrl and select HyperLink or Picture for the type and then click OK.

You should now have the following columns for you SubSites list:
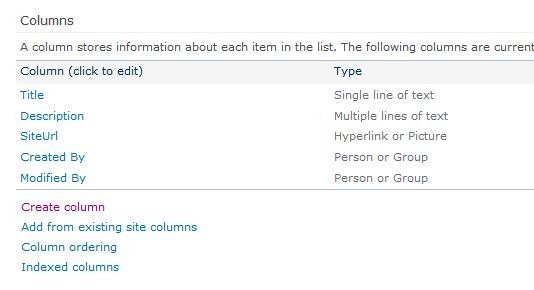
Click the Title column and change it’s name to “Site Name” and click Ok. Your columns should now look like this:
That’s it for the Site Template and the SubSite list. Now let’s look at the code for the Event Handler.
Sharepoint Event Handler code
Start Visual Studio 2010 and create a New Sharepoint 2010 Project, select Event receiver for the Project Type.
In the Sharepoint Customization Wizard select List Item Event and Custom List, then select An Item is being added and click Finished.
This will create an event handler which triggers only when an item is added in a list based on the Sharepoint custom list template.
This is the code for the Event Handler and as you can see this goes in the ItemAdding function. There are comments in the code explaining what it does.
 public override void ItemAdding(SPItemEventProperties properties)
       {
           base.ItemAdding(properties);

           // Get the web where the event was raised
           SPWeb spCurrentSite = properties.OpenWeb();

           //Get the name of the list where the event was raised
           String curListName = properties.ListTitle;

           //If the list is our list named SubSites the create a new subsite directly below the current site
           if (curListName == "SubSites")
           {
               //Get the SPListItem object that raised the event
               SPListItem curItem = properties.ListItem;
               //Get the Title field from this item. This will be the name of our new subsite
               String curItemSiteName = properties.AfterProperties["Title"].ToString();
               //Get the Description field from this item. This will be the description for our new subsite
               string curItemDescription = properties.AfterProperties["Description"].ToString();
               //Update the SiteUrl field of the item, this is the URL of our new subsite
               properties.AfterProperties["SiteUrl"] = spCurrentSite.Url + "/" + curItemSiteName;

               //Create the subsite based on the template from the Solution Gallery
               SPWeb newSite = spCurrentSite.Webs.Add(curItemSiteName, curItemSiteName, curItemDescription, Convert.ToUInt16(1033), "{8FCAD92C-EF01-4127-A0B6-23008C67BA26}#1TestProject", false, false);
                  //Set the new subsite to inherit it's top navigation from the parent site, Usefalse if you do not want this.
                  newSite.Navigation.UseShared = true;
                  newSite.Close();


            }
       }
There is one bit of information you need to get from your Sharepoint installation to be able to create a subsite from a Sharepoint template saved in your Solution Gallery. You need the GUID for the template and the name of the template. The easiest way to get this that I found was to use the old style create subsite page in Sharepoint. (Not the Silverlight one you get when you click “New Site” from the Site Action menu.)
To get the old style dialog append /_Layouts/newsbweb.aspx to the url of your Sharepoint site. For my test environment it looks like this:

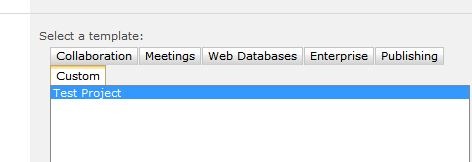
On this page select the Custom tab in the “Select a template section. There you should find the “Test Project” template we saved to the Sharepoint Solution Gallery earlier.
Now hit F12 to bring up the Developer Tools in Internet Explorer. Click the arrow in the toolbar to Select element by click and click on the Test Project box.
We are looking for the line in the following picture to get the exact GUID and name for your Template.
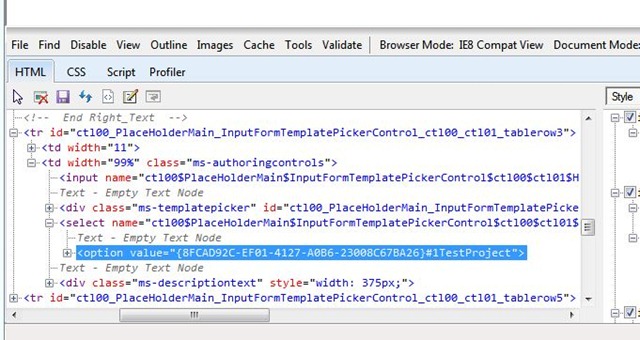
Copy the GUID including the braces and past it into the code for your Event Handler. This is the solution I found for creating a subsite based on a Sharepoint Template in the solution gallery. If anyone knows a better method I would appreciate some pointers.
[important]
| UPDATE: I have been meaning to update this article a while now so here goes. For some reason I could not get this to work when I originally tried it but it’s now working just fine. What I tried was to loop through the GetAvailableWebTemplates collection of SPWeb to get our template instead of using the hardcoded GUID I described earlier. I could never get this to return any of my custom templates, it only returned the built in ones. But as pointed out in the comments the GetAvailableWebTemplates should work. So here is a piece of updated code that should work. This means you do not have to follow the procedure earlier to get the GUID you should just update the line with String WebTemplate name with the name of the template you are looking for. |
[/important]
public override void ItemAdding(SPItemEventProperties properties)
      {
          base.ItemAdding(properties);

          // Get the web where the event was raised
          SPWeb spCurrentSite = properties.OpenWeb();

          //Get the name of the list where the event was raised
          String curListName = properties.ListTitle;

          //If the list is our list named SubSites the create a new subsite directly below the current site
          if (curListName == "SubSites")
          {
              //Get the SPListItem object that raised the event
              SPListItem curItem = properties.ListItem;
              //Get the Title field from this item. This will be the name of our new subsite
              String curItemSiteName = properties.AfterProperties["Title"].ToString();
              //Get the Description field from this item. This will be the description for our new subsite
              string curItemDescription = properties.AfterProperties["Description"].ToString();
              //Update the SiteUrl field of the item, this is the URL of our new subsite
              properties.AfterProperties["SiteUrl"] = spCurrentSite.Url + "/" + curItemSiteName;

			  // Get the rootweb where we will find the available templates
			  SPWeb rootWeb = mySite.Site.RootWeb;
			  //Get all the webtemplates available on this site collection
			   SPWebTemplateCollection webTemplates = rootWeb.GetAvailableWebTemplates(1033);
45
                       SPWebTemplate webTemplate;
46
                       String webTemplateName = "ProjectTemplate"; //this is the name of the template we will use
47
                       String webTemplateSearchName = "";
48
                       //Get the template based on name. In this example 'ProjectTemplate'
					   //Loop through the available templates
53	                       for (int i = 0; i < webTemplates.Count; i++)
54	                       {
55
56	                           webTemplateSearchName = webTemplates[i].Name.ToString();
								//Compare to see if this is the 'ProjectTemplate' template
57	                           if (webTemplateSearchName.Contains(webTemplateName))
58	                           {
59	                               //when we have found the matching template,set webTemplate to the foundt template and exit the if loop
60	                               webTemplate = webTemplates[webTemplateSearchName];
61	                               break;
62	                           }
63	                       }
             //Create the subsite based on the template from the Solution Gallery
              SPWeb newSite = spCurrentSite.Webs.Add(curItemSiteName, curItemSiteName, curItemDescription, Convert.ToUInt16(1033), webTemplate, false, false);
                 //Set the new subsite to inherit it's top navigation from the parent site, Use false if you do not want this.
                 newSite.Navigation.UseShared = true;
                 newSite.Close();


           }
      }
Deploy the solution to the Sharepoint server and try to create a new item in the SubSites list we created earlier. A new subsite based on the template we saved earlier should now be automatically created.
With the solution now deployed a new subsite will be created when the users adds an item to the Subsites list. The user never has to worry about selecting the correct template as the event handler will create the subsite based on the template we decided earlier.
In the project where we used this we where running on Sharepoint 2010 Enterprise version and could therefore use Infopath forms to replace the built-in form and make it even easier for the user with a nicer Create Site form with pictures/icons and more descriptive text. See the article Use InfoPath to replace Sharepoint List forms for an example of how to do this.
Does this work for SharePoint 2013? Can I use VS 2012 to build?
Thanks
It should work pretty much the same for Sharepoint 2013 and Visual Studio 2012. Have not tried it yet but as far as I know this should work fine.
HI Arlid,
I am trying to do that same thing as Chad mentioned. I am stuck and trying find out how do I get the GUID column from another list but not sure how to do that if you let me know that would be great . I mean to say hard code to get the value of GUID if I create Site Type lookup field column in Subsite.
Hi, you need to use the SPFieldLookupValue class to get the GUID of the template from the lookup field.
There are examples for getting the value from a lookup field here http://www.sharepoint-tips.com/2007/10/code-practices-gettingsetting-values.html and here http://sridharu.blogspot.no/2008/03/how-to-readupdate-lookup-fields-in.html
Hope this helps…
Is it possible that when the site is automatically deployed that a specific security group is automatically associated with the newly (and automatically) created site? I’m looking at doing the same as what this article states but the user will be using a workflow that, when he or she approves a certain decision (or step) that when they select “approve” from a drop down that event automatically generates a new sub-site and I’d like to have a specific security group (AD or SharePoint Group) associated with that site.
How can I do that?
Thank you
You could use code similar to this to add specific permissions to the newly created site.
void setLoginAccess(string loginName, SPWeb newsubsite)
{
SPRoleAssignment roleAssign = new SPRoleAssignment(loginName, “”, loginName, “Added by SP”);
SPRoleDefinition roleDefinition = newsubsite.RoleDefinitions[“Contribute”];
roleAssign.RoleDefinitionBindings.Add(roleDefinition);
newsubsite.RoleAssignments.Add(roleAssign);
newsubsite.Update();
}
This will add the user given in loginName to the site in the Contributor role. This is just an example so use the SPRoleAssignment and SPRoleDefinition clases to add the user or group you need to the Role you need on the Sharepoint Site.
I was just playing around and found your site. I wrote a a sample client program using client object model that can find the webtemplate id of any site (limited by sites the Client object model will allow you to browse). Thanks for sharing your
p.s. – replace with your site.
sample.using System;
using System.Collections.Generic;
using System.Linq;
using System.Text;
using Microsoft.SharePoint;
using Microsoft.SharePoint.Client;
namespace ConsoleApplication1
{
class Program
{
static void Main(string[] args)
{
ClientContext ctx = new ClientContext(“http://”);
Web web = ctx.Web;
WebTemplateCollection coll = web.GetAvailableWebTemplates(1033, false);
IEnumerable result = ctx.LoadQuery(coll.Include(o => o.Id, o => o.Description, o => o.Name));
ctx.ExecuteQuery();
foreach (WebTemplate item in result)
{
Console.WriteLine(“Item Id:{0}\n Description:{1}\n Name:{2}\n “, item.Id, item.Description, item.Name);
}
Console.ReadLine();
Console.WriteLine(“press any key to continue….”);
}
}
}
Thanks you so much !!
You’re brilliant dude.
Can’t overstate how much I love when you’re looking for a solution to a problem and find a guide where everything works 100% (at least for me it did).
Great job!
I need a confirmation before creating a subsite (ex. a popup dailogue (yes/No)….Is there any way to do this??
You would have to do the confirmation before the event handler executes. You cannot show a user dialog from the event handler.
You would have to edit the New Item form for the list and use javascript to ask confirmation from the user before actually creating the item.
If you are running Sharepoint 2010 Enterprise you can easily replace the built-in form with a Infopath form and create the confirmation dialog there, if not you could edit the New Item form for the list in Sharepoint Designer.
Awesome, Same thing i am looking for… Thanks a lot…
Nice post, I’m doing a similar thing right now, actually, except in my case, the naming convention hasn’t been agreed for each site, so I’d like to use the list item’s ID: do we have a way to get that before making the subsite, so we can use it?
Thanks,
Paul.
Hi,
I’m afraid I’m not sure which ID you mean? If it’s the ID of the item the user creates in the SubSite list you should be able to get that. You can try properties.AfterProperties[“ID”] to get the ID of the item that raised the event. I haven’t tested this yet so maybe there is an issue with the ID property beccause we are in the ItemAdding event and the item is not actually created yet.
Arild
I don’t have VS 2010. I have only VS 2008. Can I do the same thing?
Yes you should be able to use the exact same code for the event handler in Visual Studio 2008.
is it possible for subsite list to have a pulldown list of site types, like project site, team site, accounting site, etc… and based on the choice the event handler would choose the appropiate custom template when creating the subsite? that would be cool. I don’t have an VS experience so how do you deploy the solution to the farm/site collection from VS?
Yes it would be possible to have the users select specific template from a dropdown list. I guess I would implement this as a lookup field in the Subsite list and connect this to a list where we have 2 fields. One for the template name and one for the template GUID. The code for the event handler would then have to look up the GUID for the selected template in this list and create a new site based on this.
In Visual Studio 2010 you can build a package from the solution. The solution will then be packaged into a WSP file that you can install on a Sharepoint server/farm. the event handler will be installed as a Feature and you enable the feature on sites where it’s needed.